Thursday, June 30, 2016

Leap Frog Letter Factory

Many years ago, when I taught kindergarten, I needed a resource for helping my struggling students learn their letters and sounds. When I would conference with parents they would often claim that their children did know their letters. This usually meant they could sing the abc song or say the letter names in order. As students begin to read they need to not only know their letters and sounds in order, but randomly and with automaticity (knowing it without having to think about it).

Educational resources were pretty limited back then. We didn't have the YouTube resources that are now available or the educational apps that we could download. The limited resources that were available, were often very expensive. During this time I found myself relying heavily on Leap Frog products.

My number one "go to" resource was this Leap Frog Letter Factory video. I ended up buying several copies and sending them home for parents to use with their children. Now keep in mind this was during the VHS cassette period. Wow, I'm making myself sound really old! Anyways, I found success with students that were faithfully watching the video at home and also with students who I was using it for in class. During whole class instruction I would introduce a letter and then sing the letter song. All students were familiar with the Letter Factory.

As I began to have grandchildren, my children and I used the video to help my grand kids learn their letters and sounds. That too was many years ago, but with a new addition to our family, I wanted to give my daughter a copy of this video to use. My grandson is only 6 months old, but my daughter is also babysitting a 3 year old, so I thought the video would be perfect. The problem was that all of my copies were VHS, so that meant I had to purchase a new one. I actually found a used copy on ebay for about $5.00. What a steal! This recent purchase has reminded me of what a valuable tool this video is, I absolutely love it, so I thought I would share this FYI blog with you.


Anna Navarre’s TpT Store

Friday, June 24, 2016

Hand Art

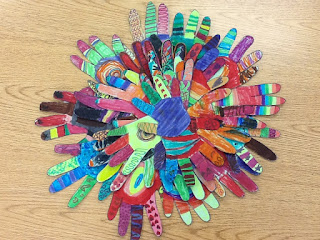
This art project makes a cute beginning of the year activity, although my class actually did it as an ending of the year thank you gift to our classroom aide.

I've seen hand cut outs that can be used, but I wanted to make the project more personal. I traced students' hands onto green cardstock paper. I'm sure white or any other color is fine. I just liked having a color backing in case students didn't completely color in the hand.

After I traced a student's hand with a sharpie I wrote their name on their paper. The next day I gave everyone their hand and showed them some ideas for designing their hand with markers. They all came up with their own original ideas, which made each hand more special.

Once all of the art work was done I cut out the hands. Older students could, of course, do this part on their own, but I didn't want to trust it with my first graders. I cut the hands out and then wrote the names on the back of the hands.

I used another piece of green cardstock paper for mounting the hands onto. I tried cutting a big circle, but I had too many hands, so I ended up just rounding the edges. I arranged all of the hands in place to make sure I was happy with it before I glued anything. I placed the larger hands down for the first layer. The next layer was the medium size hands and the final layer was the smaller hands. After I had the hands laid out I picked up the top two layers keeping each layer together. I glued the bottom layer by leaving the hands in place and picking up one at a time to glue it on. I continued this process for the next two layers. I had one extra small hand, so I put that in the middle.

I wrote a thank you note on the back. Afterwards I found a class picture, which I gave to my aide as well. I wish I hadn't written the note on the back, because I would have glued the picture there instead.


Please feel free to visit 
Anna Navarre's TpT Store


Tuesday, June 7, 2016

Father's Day Tie Card


This is a Father's Day card that I have my students make for their dads. I usually have a parent cut out the pattern, but then after that they are pretty easy for students to make.


If you are doing this whole class it is easiest to start off with a tie pattern. In order to make the pattern fold a 9" x 12" piece of construction paper in half. Then draw two trapezoids across from each other. Snip off two triangle pieces at the bottom of the tie. In order to make the rest of the ties you can just trace the pattern. I have reused the same pattern for years. You can decide if you want to draw the tie knot or have students draw it on.


Provide each student with a tie. Have students open up the card and write a Father's Day message. I usually model this on the board, but allow students to either copy mine or write whatever they want. Remind students to sign their name. 

Once students have finished their writing they can use a black crayon to draw the knot on the tie if this has not been done for them. Then they can color the ocean floor and some plants/rocks. As students are ready you can have them use sea creature sponges to finish off their tie. I don't really remember where I purchased these sea creatures, because I got them quite a few years ago, but I believe I  purchased them from a dollar store. If you can't find sea creatures sponges you could cut up a sponge to make your own or just have student paint something simple like a fish, whale, or a starfish. 


I hope that you find this Father's Day idea helpful. Anna


Anna Navarre's TpT Store


Sunday, June 5, 2016

Flower Pots


This Flower Pot project is a fun project that I like to do when my class is learning about plants. It is kind of messy but worth it. I love to see how students put their own special spin on the project to make their art more personal and unique. 


Here are the directions for doing this project.

Materials:
- Blue, green, and brown tempera paint
- Other tempera paint colors for the flowers
- 8" x 11" White cardstock or construction paper 
- 9" x 12" Yellow or other color construction paper 
- 9" x 12" construction paper to use as a work mat 
- Paint brushes
- Containers for paint (I like to use pie tins)

Directions:
Be sure to prep your materials beforehand, especially if you are doing this whole class. When you put the paint in the containers you will want to water it down a little if it is too thick. Place the blue paint and paint brushes out for students to use. 

Once all of your supplies are ready then you can provide students with the work mat and white paper. Have students write their name on the back of the paper before they get started. Then have them paint the whole page blue. My students know that I have a "no white" rule. They need to make sure that there is no white showing when they are done.

The paint needs to dry for a couple of minutes, so as students finish I have them go to the carpet and read while they wait. This project does require quite a few paint brushes if you are doing this activity whole class, so you will want to wash out the paint brushes while the blue paint is drying. You can also remove the blue paint and put out the other paint.

After the paint has pretty much dried you can have students go back to their seat. Then show them different ways to paint a flower pot/vase (round, square, or triangular). You will also want to show them how to add the stems, leaves, and flowers. I usually only have my students use two colors. The middle of the flower is one color and then the petals are another color. Show your students different ways in which the flower petals can be made. I usually show them how to either brush out a petal or dab the brush down to make the petal. Students always tend to do what works for them and what they like, so it doesn't really matter. 

Let the painting dry before mounting them onto the colored construction paper. Once they are dry enough to stack I like to place some books on top of them to flatten them out. Then I glue them onto the mounting paper and write their name at the bottom of the page. I then of course hang them up for all to see. 


Anna Navarre's TpT Store


Teachers Appreciation Poster

This was a really neat poster that our PTO made for the teachers at my school. I'm sure it has been done before, but I have never seen it, so I thought I would share it with you to enjoy.

Here is what it says:
Thank you, teachers! You are all Sweetarts. You deserve 100 Grand every Payday. We know sometime our kids act like Air Heads or like they're from somewhere beyond the Milky Way. You bring them such Almond Joy when you teach. It must be hard to contain your Snickers when those Sugar Babies tell you Mounds of stories. Sometimes it must seem that all you do is Skor papers and you want to make like Baby Ruth and run home! For all you do, thanks! you are numero U-no.

I hope you enjoyed this poster as much as I did.
Anna


Anna Navarre's TpT Store