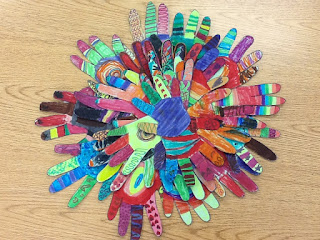
I've seen hand cut outs that can be used, but I wanted to make the project more personal. I traced students' hands onto green cardstock paper. I'm sure white or any other color is fine. I just liked having a color backing in case students didn't completely color in the hand.
After I traced a student's hand with a sharpie I wrote their name on their paper. The next day I gave everyone their hand and showed them some ideas for designing their hand with markers. They all came up with their own original ideas, which made each hand more special.
Once all of the art work was done I cut out the hands. Older students could, of course, do this part on their own, but I didn't want to trust it with my first graders. I cut the hands out and then wrote the names on the back of the hands.
I used another piece of green cardstock paper for mounting the hands onto. I tried cutting a big circle, but I had too many hands, so I ended up just rounding the edges. I arranged all of the hands in place to make sure I was happy with it before I glued anything. I placed the larger hands down for the first layer. The next layer was the medium size hands and the final layer was the smaller hands. After I had the hands laid out I picked up the top two layers keeping each layer together. I glued the bottom layer by leaving the hands in place and picking up one at a time to glue it on. I continued this process for the next two layers. I had one extra small hand, so I put that in the middle.
I wrote a thank you note on the back. Afterwards I found a class picture, which I gave to my aide as well. I wish I hadn't written the note on the back, because I would have glued the picture there instead.
Please feel free to visit
Anna Navarre's TpT Store


No comments:
Post a Comment