Saturday, August 31, 2019

Unscramble the Word Videos

As a side hobby, I make a lot of different types of videos. They are mostly educational though. Throughout the last year, I had fun with my Unscramble the Word videos. They are simple little videos that anyone can have fun with, or they can be used in the classroom. If you use them in the classroom, you can play the video and let the kids unscramble the words. This works well as a Brain Break, or to give you a couple minutes to deal with those things that come up. The videos are mostly geared toward seasons and holidays, but I’m thinking of expanding to other topics.

I’ve posted these videos here, but you can also view these videos on my YouTube channel: Link YouTube Channel

Unscramble the Back to School Words

Unscramble the Fall Words

Unscramble the Winter Words

Unscramble the Valentine Words
Unscramble the Spring Words

I hope that you have fun with them. Enjoy, Anna

Tuesday, April 16, 2019

Whiteboard Erasing Tip

Do you hate those black smudge marks after you try to erase your whiteboards? It drives me absolutely crazy! Trying to get my laminated word cards clean is an even bigger problem. I have tried board erasers, paper towels, whiteboard spray, baby wipes, and whatever else I could get my hands on. The baby wipes and spray work okay, but then I have to wait for my whiteboard to dry.

Well, here is a little trick that you might not know. You can use Magic Erasers to clean your whiteboards. They work GREAT! Don't wet them, just use them as they are. I cut mine in half because I use small whiteboards and word cards. Obviously, they get dirty, so after you are done using them you can give them a quick rinse and then let them dry before using them again.

This tip may not be practical for the large classroom whiteboard, but it is perfect for my online classroom. It is also perfect for small groups and for students who have individual whiteboards. 

I found this tip online somewhere. I wish I could remember where so that I could give credit to that person. I have to admit, I didn't really think it would work that great, and I hadn't planned on trying it, so I didn't save the link. I had one lonely Magic Eraser left in my cleaning supplies, so I decided to try it. Yep, it worked. Now, I am a believer. I just went to the store and bought a new box of Mr. Clean Magic Erasers. They had a generic brand, but I didn't want to take any chances. I'm sure they would have been fine.

I hope that you find this tip as helpful as I did. Have fun erasing!

Monday, December 24, 2018

Snowman Christmas Gift Idea


I thought I would share this snowman gift idea because I love it so much. I don’t have a blog for miscellaneous ideas, so I’m using my teaching blog. It doesn’t quite fit, but it will work. I found this idea on Pinterest, but I was left to figure out things for myself since it was only a picture with no link or details.


There are a few things that would have been helpful to know ahead of time.

1. Boxes - I bought my boxes at Walmart in the school supply/shipping material section. The middle box was not quite the size I wanted, but close enough. All three boxes cost less than $2. A couple of the gifts I bought were already boxed in good boxes, so I just used them.

2. White paper - This was a big problem for me. I looked everywhere and couldn’t find solid white paper. I was about to order white butcher paper online when I finally found white paper at the Dollar Store. I pretty much used one roll for each snowman. The rolls were not very big.

3. Gifts - Deciding what to fill the boxes with can be a bit tricky as well. The main thing is thinking about size as you shop. Here was my general plan: The small box - snacks/treats, the middle box - pajamas,/slippers/DVD/book, the large box - toys for the kids, and miscellaneous gift ideas for the adults.

Once the snowman was wrapped I used black construction paper and cut out 6 small circles for the mouth, 2 medium size circles for the eyes, and 3 larger circles for the buttons. I cut out a large orange triangle for the nose. I finished off the snowman with a ribbon scarf and a beanie. I bought the beanies at Walmart too. I found them in the woman’s accessory department.

Adding a gift card/money is an extra bonus. I used a red money card that I thought was really pretty. I filled the card and then taped it closed. I didn’t want to use the white envelope. I wrote the name on the outside of the card with a sharpie.

Our snowmen had to travel, so we wanted to make sure we knew which box went to which snowman/family member. The solution was to write the names on the top middle part of each snowman box. When they were assembled you couldn’t see the names. My family loved them!

When my husband was wrapping my present he got creative and added penguins to his packages. I couldn’t really come up with anything, so I decided on a Christmas tree to wrap his presents.

I hope that you like this Christmas snowman gift idea. I pray that you have a very Merry Christmas and that you always remember that Jesus is the true reason for the season. God bless!


Here are a couple other Ideas that you might like:

Christmas Eve Pajama Boxes

Stocking Stuffer Ideas from Dollar Tree


Monday, November 19, 2018

Make Money Teaching Online with VIPKID!

Make Money Teaching Online with VIPKID!


It has been just over a couple of months since I started my VIPKID journey. I absolutely love it! At first I was a little suspicious about it being a legit deal, so I did some research. I found that VIPKID hires people to be online teachers for kids in China. They want the kids to learn English correctly, so they hire native English speakers. After feeling comfortable that VIPKID was not some sort of scam, I decided to follow through. I logged onto the sight and started the interview process. I clicked through the questions and was immediately given the option to set up an interview.  The requirements were a bachelors degree and teaching experience. The website that I learned about VIPKID from also mentioned them wanting a commitment of at least 7.5 hours a week, but that was never brought up during the interview process.

My online interview took place 3 days later. I chose to give myself some time, because after the first portion of talking with an interviewer I had to do a lesson. I wanted to be sure I was prepared. It was pretty easy. The interviewer acted like a student from China as I went through a lesson that was provided. The key is that you definitely need to be energetic, animated, talk slowly, smile, and use TPR (total physical response – hand gestures). At the end of the interview I was offered a position and given my pay rate. I was also told that I would need to submit all of my documents, and pass a mock lesson before I could start teaching.

I didn’t pass my first interview, which was a bit nerve racking, but It didn’t seem like a realistic expectation for me to have passed it the first time through. I had no idea what I was doing. Teaching online is definitely different than teaching in the classroom. Anyways, the tips I got after my first mock interview and tips from YouTube videos were very helpful. I passed the second time.

I have to say, that it was quite a process getting started. If you are a quick learner I’m sure you will find the process much easier. I have to study hard for everything. Anyways, I was ready to start teaching. This is probably the stage in which most new hires get discouraged. They have gone through the process and are ready to start rolling in the bucks. That doesn’t always happen right away. It takes time for parents to know you are out there. I only wanted part-time, so a slow start was fine with me. As it turned out, I was pretty lucky. I spent my wait time getting a couple more certificates. You are certified to teach certain types of classes. It was about 2 weeks after passing my mock lesson that all my open slots started getting booked. This is about 15 hours a week, which equals 30 classes. That is plenty for me, because again I only want part-time.


Okay, so there are some other things to know if you are considering  a job with VIPKID. First are the hours, remember that you are teaching kids in China. I live in Arizona, so it is a 15 hour time difference. The kids go to school during the day, so that means VIPKID teachers need to be available during the very early morning hours. Their weekends are our Friday and Saturday, so all-nighters are a definite option.  Basically, the hours are ruff.

The pay is good, especially since you get to work from home. It varies based on your experience. I have classroom experience with a Masters in Education. I have a Bilingual supplement, but I am not a certified ESL teacher. My pay is $10.50 for a 25 minute class (5 minutes feedback/prep) x 2 is $21.00 an hour. This rate is broken up. It is a base pay of $8.50 plus $2.00 of incentives. It equals up to a pretty good check for part-time work. I get paid twice a month.

At VIPKID you are considered self employed with a 6 month contract. You get to choose when you want to work, but remember our daytime is their nighttime. That means this is not an 8-5 job. Being self employed also means the company does not offer employee benefits. There are lots of incentives though if you want to do the extra work.
Having a reliable internet service, a good computer, good headphones, and a good camera is important. If you don’t have these things then teaching can be a bit of a challenge. The bad part is that you can get dinged for it. Internet issues could cause you to miss a class. This could mean getting charged for it, or it just showing on your record. I don’t know how much of an impact that has on your VIPKID journey, but the fear is not having your contract renewed after 6 months.

As all teachers know, prep time is part of the teaching gig. I think the amount of prep time that you put in as a teacher really depends on what you feel comfortable with. Also, some people have a gift for seeing something one time and remembering it. I don’t have that gift at all! So even though the lessons are on PowerPoint slides, I still have to spend time looking through each lesson and getting my props ready. I know that the longer I teach with VIPKID the less I will have to prep for a lesson, but at this point it still takes time.

Lastly, the best part of teaching with VIPKID is the kids. There are some that are a challenge, but understandably. They are tired after a long day and are listening to someone that they may not understand. Other students are so fun! They are excited about learning and just bring a smile to your face. You leave the class hoping  that they will book you again.

Okay, since this post is already way longer than I had planned, I will stop. I hope that you find this information helpful. Good luck! Anna


Wednesday, June 13, 2018

What to Do When Someone Bugs You

In today’s crazy world, it is so important that we provide kids with the proper tools for becoming independent problem solvers. I know that it has always been important, but nowadays it seems like the problem is getting worse. Children just don't know how to solve simple problems, along with the fact that "bullying" has become a more common problem. I don't know, and I sure don't want to debate the issue, but I want kids to have strategies that will help them learn, or at least try to learn, to solve their own problems. They need to have the proper tools to help them, which I'm not so sure they are being provided as often as they should be, if at all.

 I guess I could get a little carried away on the subject, but anyways, I put together this “What to Do When Someone Bugs You” packet several years ago. It is a packet that I have used to help students learn some problem-solving strategies for when there is someone bothering them. With the new school year starting soon, along with seeing the need for kids to have this kind of information, I decided to write this blog post.

My "What to Do When Someone Bugs You" packet is a resource that can be used as classroom posters and/or put together in a classroom book. There are four steps/strategies in this problem-solving packet. As this resource is used students learn to identify the problem, learn a helpful strategy, and then learn what to do if that strategy doesn't work. The last resort being to tell the teacher or an adult if none of the other strategies work, or if there is an emergency.

This isn't a resource just for the beginning of the school year. It really is a good resource to use/review when you see that students are struggling with relationships. The first clue is a lot of tattling (Ex. He won't leave me alone. She hurt my feelings.etc.). Problem-solving strategies are one of those things that young children need to be reminded of often. That is because they need to learn when to use them. Referring back to the posters allows students to think of new situations in which they can be applied.

If you are interested in this packet you can purchase it from my TpT Store. I've included the link below. I've also included my store link in case you would like to check out some of my other products.


Mrs. Navarre's TpT Store


Saturday, June 2, 2018

VBS Game On Rock Painting

My church is having Vacation Bible School (VBS) later this month. I am going to be helping with the pre-k and kindergarten class, which should be a lot of fun. I have been busy getting some things ready for my "Game On" (sports-themed) classroom. In my excitement, I decided to paint some rocks to go with this theme. 


The process is actually quite easy if you have the right supplies. Here are some of the things that I used for this project: 
*clean rocks with a flat surface
* acrylic paint (I use indoor/outdoor paint)
* brushes (various sizes)
*picture patterns that fit the rocks
*carbon graphite paper 
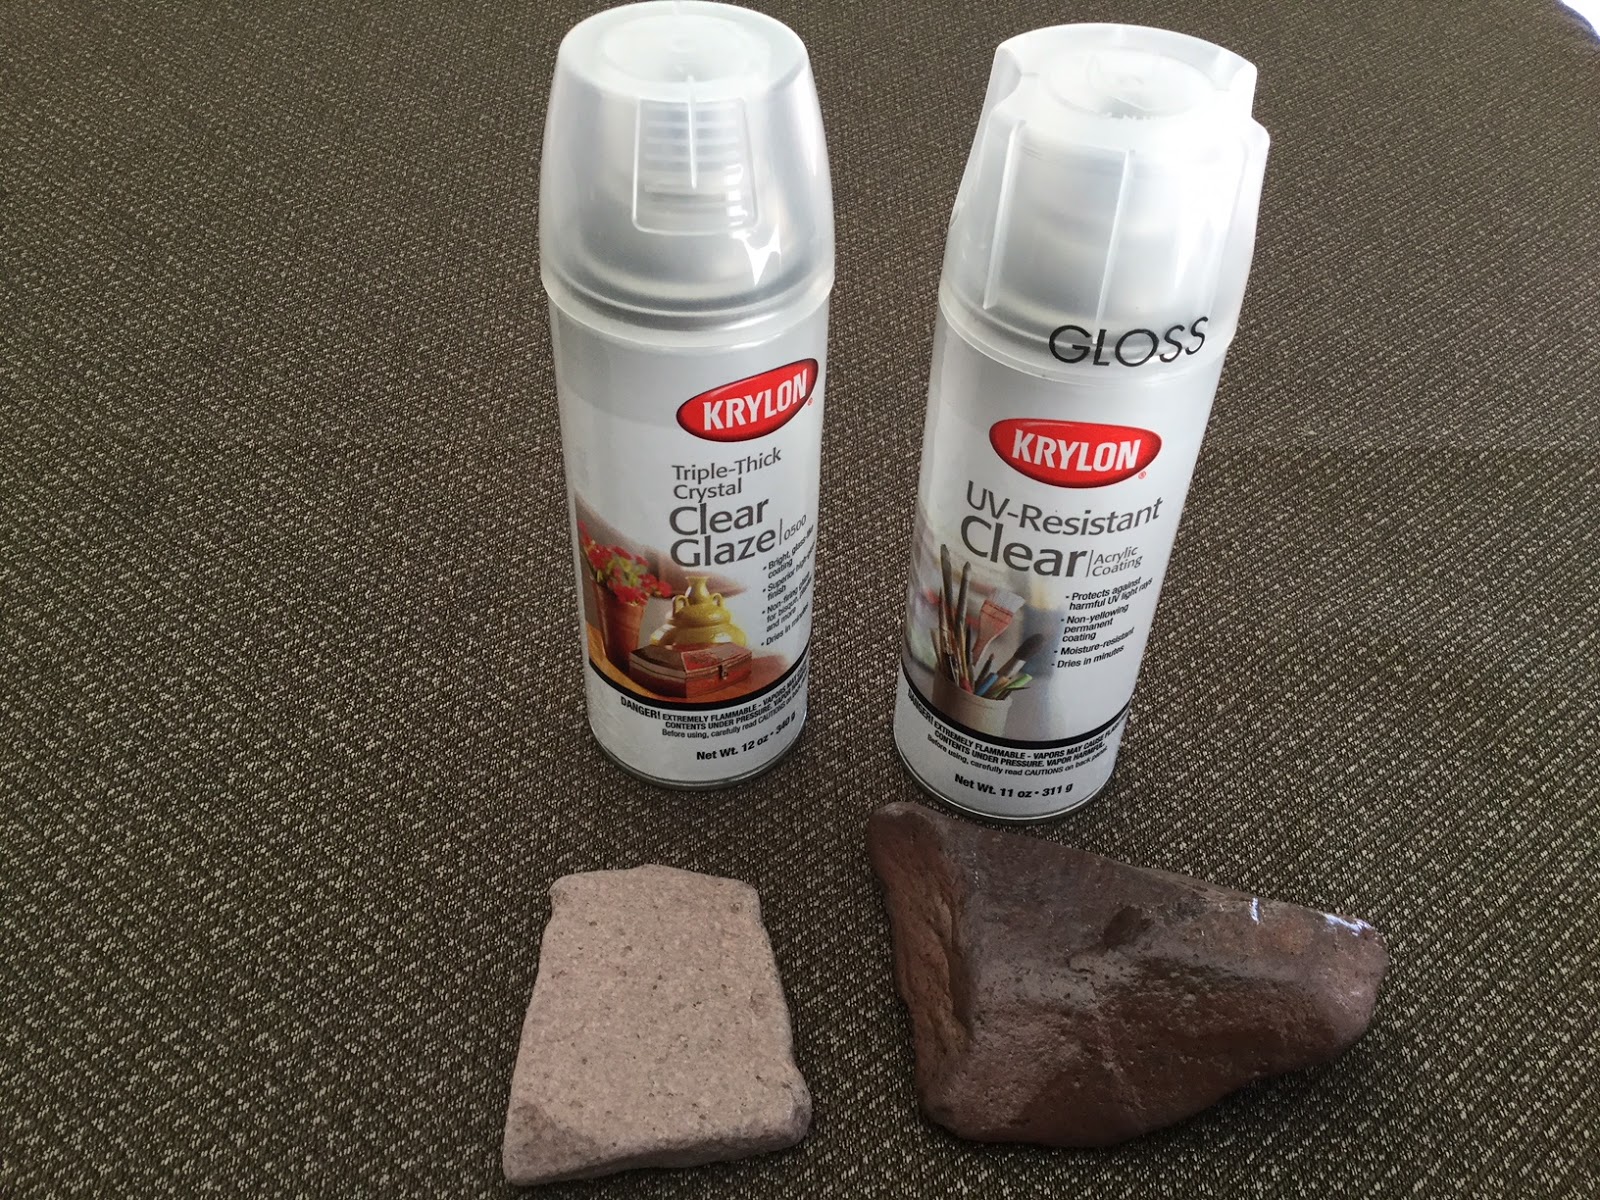
* clear glaze spray

Using graphite paper to trace the picture onto the rock makes the whole process much easier for those of us who can't even draw a circle without help. I just taped the graphite and picture onto the rock and traced it with a pen.  

Once I had the picture traced onto the rock I was able to paint the rock in sections and trace/paint the outline with black paint. 

After I painted my rocks I sprayed them with the clear glaze. I used regular spray, but I do have UV-resistant spray for outdoor rocks. You, of course, don't need to spray the rocks at all, but you can see from the picture what a difference the spray makes.

 This was really a relaxing project and one that older kids could do. I think rock painting is a good gift idea too. My grandson would love these sports rocks for his room. 


Thanks for visiting my blog. I hope that you enjoyed this blog post. Please feel free to visit my TpT Store for teaching resources. 

Anna Navarre's TpT Store


Thursday, May 31, 2018

Alien Code Read and Write Around the Room

 I absolutely love interactive learning games. They are a great way to allow students to have fun while practicing the skills they need. This is the reason I like this Alien Code Read and Write Around the Room Phonics Game. Students can definitely have fun with it as they practice CVC, silent "e" or vowel team words. Students are completely engaged as they move around the room working to break the code. 


Each game set consists of 30 alien code cards, 6 blank cards, an Alien Code Breaker sheet (in both colored and black and white), a recording sheet, and an answer sheet. 


The game is easy to prep and easy to play. The Alien Code cards are hung around the classroom. Students stand in front of a card and wait with their Alien Code Breaker and recording sheets. Once everyone is ready the game begins. Students read the card and use the Alien Code Breaker sheet to break the code on the card. This is a little tricky, because the codes are written with random symbols that represent a letter.  

 After students have figured out the word then they write the word on their recording sheet. Students move to the next word when the teacher rings a bell, or somehow indicates that it is time to move.    

After students have moved around the classroom and completed their recording sheet they get to check their answers to see if they broke the codes correctly.   

The games are sold separately, or in a bundle. This blog post shows the phonics bundle, but there are also games for sight words. 


Here are the links to both the Phonics and Sight Word Bundles:

Alien Code Read and Write Around the Room Phonics Bundle

Alien Code Read and Write Around the Room Sight Word Bundle

*Individual games can be accessed from each bundle